October 2013

Haai loves, these past few days I've seriously been slacking on my posting anything up onto my blog and it makes me feel bad because I made a promise that I would try to post something every single day. I did not realize how hectic my schedule would be this past week and basically have not had time for anything, I do apologize, but I have some awesome ideas and I will be trying to post a lot more.

The other day, my friend, Andrea and I have been talking about doing a fashion collab for quite some time now, but never got around to doing it. We finally got around to doing it and I'm glad we did it for our favorite seasons. We wanted to show you girls how we'd wear military colors during the fall and winter time.
*Note: We live in Arizona where it doesn't necessarily get cold which is why we wear shorts and such all year round. If you live in a colder area, feel free to change up these ideas.


For my military inspired outfit, I wore this green jacket my friend's dad, who was in the Marines gave to me a while back ago. I absolutely love this jacket; I don't really know what the material is, but it is close to being cashmere. It is so warm and adds a little something to every outfit. I will definitely be wearing this jacket quite a lot this coming winter. I paired it with a checkered long sleeve crop top that I got from GoJane. I rolled up the the sleeves on both the jacket and top to add more pattern to the jacket (this was Andrea's idea). I wore my black high-waisted distressed and studded denim shorts that I DIY'd and my trusty white and black creepers from TUK Shoes. The bowler hat the I'm wearing is actually Andrea's hat that I believe she said she got in the Halloween section. The sunglasses that I didn't get to wear due to lack of sun that day are from Old Navy, although you can't really see the beauty of them in these pictures.


Andrea's outfit is definitely my favorite out of the two. She paired these military trousers she actually got off her boyfriend with a faux leather bustier top that has spikes on the cleavage area from Urban Original. She wore my faux leather jacket that I DIY'd and Dr Martens. The faux leather edges up the look and I absolutely love it.


We have a lot more fashion collabs coming your way so I hope you enjoyed this one! Andrea does not have a blog yet, but show her some love on her social networks:

Instagram - laamuerta


xx


Military fall/winter looks

Posted on

24 October 2013

Category

,

,

If we are friends on Facebook, you may have saw my post last night basically thanking all my viewers for taking the time to check out my blog. I also said I wanted to post a tutorial everyday as a 'thank you'. I decided to continue on with my Halloween nail tutorials because I continue to come up with ideas. For today's "look", I went with Count Dracula.


Begin with applying your base coat. (I feel like I'm always repeating myself, but this very important if you don't want to stain your nails!) Once that is dry, I painted all my nails black except for my ring finger. The black polish I used was a random matte polish I found at my local oriental shop. I don't know as to why I even decided to paint my nails with a matte finish because my top coat was obviously just going to ruin that matte effect - if you would like a matte effect after you've done your design, I recommend NYC's Matte Me Crazy top coat. For my ring finger, I mixed a muted grey-ish color (Revlon's Top Speed in Stormy) and a white polish. I just felt that Stormy was a bit too dark for this look in particular and why go out an buy another nail polish when you can improvise? 
*Note: It does not matter how messy you paint your nails, all you need is a cotton swab or nail brush dipped in acetone and clean the edges as much as possible once you've finished your manicure.


I began with dipping my nail striper into black polish and drew Dracula's hair. To make the 'v' a little more defined, I took another striper with the grey/white polish mixture I made earlier and shaped it out a little more. Once you add your top coat, you won't see that harsh line that you see above on my nail.


Next, I gave Dracula some brows and drew the top of his infamous cape.


My camera's battery died shortly after. All I did was take some pastel blue polish on a dotting tool and gave him some eyes. I went with this pastel blue to add some color, but not something that was too harsh. Once that dried, I dotted on black pupils. Then, I drew a straight line for the mouth. With your nail striper and white polish, draw on Dracula's fangs; I simply did two triangles. I added some red onto his fangs because no vampire look is ever complete without some blood.


On my thumb, I drew this white arrow-like thing that is basically just Dracula's simple white collared shirt.


I then drew a simple red bow tie and added two small black lines on each side. I went back to my pastel blue and dotted on small blue dots going down the white part. (I did take a picture of that, but I accidentally deleted it)


For the rest of my nails, I simply took a cosmetics sponge, sprayed a little water on it and applied some red. I wasn't really going for an ombré look, I just wanted to add some color to the boring black. If you'd like to try out the ombré look, you can paint your whole nail red, then sponge on black and a burgundy color in between the red and black to blend it out.


I really hope you guys have been enjoying my Halloween nails. If you want to see something else, doesn't necessarily have to be nail related, do not be afraid to leave a comment with your suggestions. Thank you xo


Dracula Nail Art

Posted on

17 October 2013

Category

,


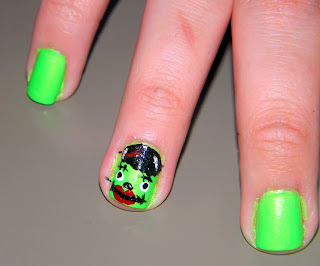
Haaai! Last night, after I posted my mummy nails tutorial, I wanted to do another Halloween tutorial as soon as possible, but I didn't know which look I wanted to do next. Then I began to stare at my nail polishes and this neon green polish stood out from all the others and immediately thought, "I SHOULD DO A CARTOON VERSION OF FRANKENSTEIN'S MONSTER!!", and that is what I did. I'm here to show you girls a quick step by step tutorial on how to recreate Frankenstein's Monster nails. I also made a female version of this monster - you know, the one Victor Frankenstein would have created if he didn't die...well at least in my imagination, that's what would have happened. Anywho, let's get started with this tutorial!


What you will need:


Start off with your base coat, as usual. Once that is dry, apply two coats of your lime green polish. I used about 3 simply because this nail polish in particular isn't very pigmented. After those have been left to dry for a few minutes, I added a top coat to speed up the process.


Female:


Dip your nail striper into your black polish and draw the hair. You can make it as messy or as neat as you choose.


For the eyebrows, I drew two horizontal lines with a slight curve and added two smaller vertical lines, kind of like the stitching.


Take your dotting tool and dip it into the white polish and make two circles under the brows. These of course, are going to be your eyes (duh, Jessica!) . Once you do that, wipe off your tool.


Take your dotting tool again, but now dip it into the black polish


Now with your striper, draw a nose and mouth


I took red nail polish with another nail striper and drew on some lips and a bow because I mean, she is supposed to bed a girl, right?


I then added some small white vertical lines onto the hair, inspired by Frankenstein's bride. Your nail now should look something like this. (Maybe even better too!)


Now for the male:


Follow the same steps as I listed above except the lips and bow (LOL). I did the infamous mono-brow but added a bit of stitching to it, as well as the mouth.


For the rest of my nails, I drew a set of stitches on them. I drew the monsters only on my ring and index fingers.


And this is my final look! I really hope you guys enjoyed this nail look. If anyone has a request on any Halloween nails you'd like me to do, leave a comment below; More will be on its way. Much love,


Frankenstein's Monster Nails

Posted on

09 October 2013


Halloween is right around the corner, you guys! I am absolutely excited to dress up and go trick or treating because I mean, you are never too old to go trick or treating. To get in the Halloween spirit, I became inspired to do this very quick and easy mummy nail art design. If you are interested in seeing how I did this design, keep reading.


To achieve this mummy look, you will need:
  • A white nail polish - mine is from KleanColor (04 White). I found this one at my local oriental shop
  • Black polish - L.A. Colors Color Craze Polish (Circuits)
  • Nail striper brush (If you have a black nail art polish, that is even better)
  • dotting tool or a toothpick


Let's get this tutorial started!
*Note: I apologize if my fingers look very dry. My nail polish remover makes them look that way and I absolutely hate it.


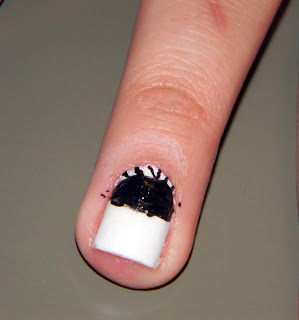
Start off by applying a base coat. This will prevent your nails from staining from the polish and extend the life your manicure. My new favorite has been Kiss Diamond Hard nail strengthener - it is nothing less than amazing. Once you've let your base coat dry, apply a coat of white polish, wait a few minutes, then apply another coat. Let your nails completely dry before you begin with the design.


Once your nail is dry, get your striper and dip it into the black polish (or acrylic paint) and make half a circle. This is where the eyes of the mummy will be placed.


Draw a few lines going diagonal on top of that half circle you create. I made my lines going in both directions because the rest of your nail will consist of diagonal lines going in opposite directions. These lines will act as the bandages on the mummy.


First, draw three diagonal lines going to the right side.


Next, draw more lines, but this time, the will face the opposite side. I drew mine small because I wanted to add more lines and wanted them all to fit.


The last set of lines will be going in the same direction you did your first set.


Grab your dotting tool or tooth pick and dip it into your white polish and draw two dots in the black area.


Then with black polish, make smaller dots inside your white dots. These are the pupils of the mummy's eyes. You can also use googly eyes to give it a 3D effect if you'd life. Once you had let your design dry for a few minutes, seal in your manicure with your favorite top coat. It is very crucial that you do let them dry before applying your top coat because the design will bleed and it will be ruined. I hate when I spend some time trying to make some designs just for them to be ruined once I apply my top coat.


I did this design on my ring and index fingers and applied Essie's polish in Wicked on the other nails. You can do any color you choose or you can even draw the mummy on all nails which would look amazing as well! Hope you girls enjoyed and stay tuned for more Halloween nail tutorials!


Mummy Nail Art

Posted on

08 October 2013